After cutting off part of the skirt from the wedding dress, the off-cuts were used to make a lil’ something for carrying essential tidbits and still looking elegant on the big day. Luckily there was enough fabric for this to materialise! My daughter loved it so much she decided she needed one to (to carry her much needed fluffy rabbit during the wedding, of course).

Here’s how I made it.
Materials:
top: 2 x 21 cm width x 9cm height panel
circle: 2x 12cm diameter circle (size of CD) + 1cm seam allowance around edge
side panels: 4 x 19+2cm width of side panels x 10cm height of bag + 2cm seam allowance
cording: 2x 50cm lengths of ribbon.
- If using fine silk fabric, baste both inner side panels and inner circle with fusible interfacing.
- Fold both top pieces in half along width, press.
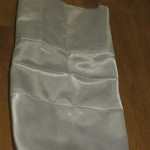
- Make a sandwich of outer side piece with folded top piece in between and inner side piece on the bottom, right sides together as in picture 1. Ensure raw long edges of top piece are aligned with long edge of side panels.
- Pin one edge of top piece to outer side piece and sew. Pin the other edge of the top piece to the inner side piece and sew.
- Repeat with remaining inner, outer and top pieces.
- Open out flat and mark where 2cm gap for tie should be on both raw edges of top piece adjoining the outer bag pieces – 2.5cm and 4.5cm down from fold of top piece.
- Pin both sets of sewn panels right sides together and sew along both long raw edges leaving gap marked in previous step and 6cm gap in inner panel for turning bag inside-out.
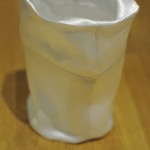
- Press seams open as in picture 2, taking care not to iron out the fold in the top piece.
- Keeping bag as cylinder, mark circles into eighths (by folding into half and half again, twice). mark bottom of inner and outer sides into eighths.
- Pin and sew outer circle to bottom of outer cylinder. Turn bag inside out through side opening. Pin and sew inner circle to bottom of inner cylinder.
- Turn bag right side out through the inner side opening gap and sew up gap just barely catching the edge of the fabric. Stuff the lining into the bag.
- Mark and sew two parallel lines 3.5 and 5.5 cm down from top edge of bag to create casing for cording.
- Thread first length of ribbon all the way through the casing using a safety pin. Tie ends of ribbon together. Thread second length of ribbon starting on opposite side of bag to first ribbon. Tie ends of ribbon together and trim ribbons if necessary.
- Pull both ends of tied ribbon, one with each hand et voila, the bag is drawn closed.
-

- 1. Upper piece in between bag side pieces
-
- 2. Flattened out after sewing
-
- 3. Bottom circle pieces attached
-

- 4. Close up with pretty straps
-
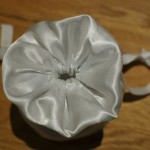
- 5. Aerial view
-
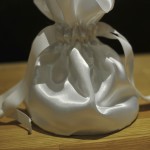
- 6. The finished bag